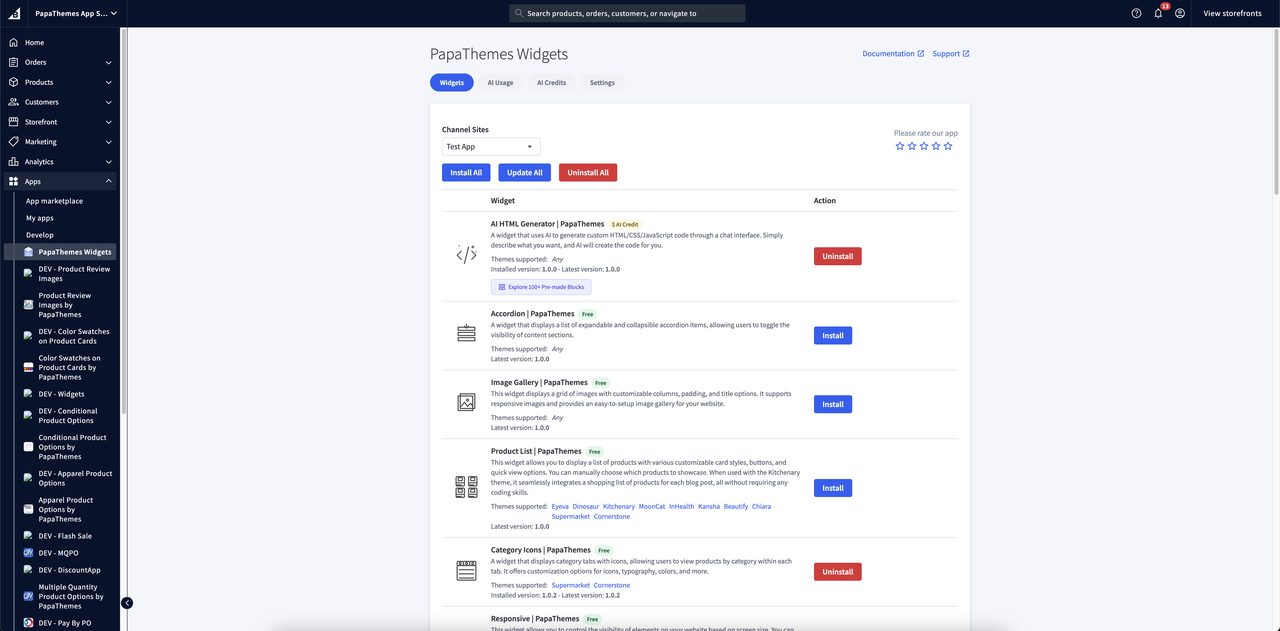
AI HTML Widget for BigCommerce
What is the AI HTML Widget?
The AI HTML Widget is your personal design assistant inside BigCommerce Page Builder. Instead of hunting for the right widget or hiring a developer, you simply describe the section you want — a hero banner, a feature grid, a countdown timer, a signup form — and the AI builds it and places it on your page for you.
You chat with it in plain English. You can ask for changes as many times as you like, paste in a picture for inspiration, or start from one of hundreds of ready-made templates. It is the fastest way to add polished, on-brand content to your store without touching any code.
Page Builder name: AI HTML Generator | PapaThemes
Version: 1.3.3
When to use it
Reach for this widget any time the standard Page Builder widgets do not give you the exact look you want — custom layouts, promotional sections, interactive elements, landing pages, and more.
What You Can Do
- Generate complete page sections just by describing them
- Apply the AI's work to your page instantly, with one message
- Edit any element visually by clicking it — a docked design panel opens, no chatting required
- Duplicate, move, or delete any element with a floating toolbar
- Arrange row, column, and grid sections with visual layout controls
- Tune styles per breakpoint for Desktop, Tablet, and Mobile
- Start from a gallery of ready-made section and popup templates
- Paste an image as a reference, or ask the AI to create an image for you
- Refine anything with simple follow-up requests
- Step back to an earlier version if you change your mind
- Stop a long answer at any time and keep going
- Compact a long conversation to keep your credit usage low
Getting Started
1. Add the widget to your page
- Open Page Builder in your BigCommerce admin.
- In the widget panel, find AI HTML Generator | PapaThemes.
- Drag and drop it onto the spot where you want your new content.
- The widget shows a friendly placeholder card until you generate something.
2. Open the AI assistant
- After adding the widget, a purple AI button appears in the bottom-right corner of Page Builder.
- Click it to slide open the chat assistant from the right side of the screen.
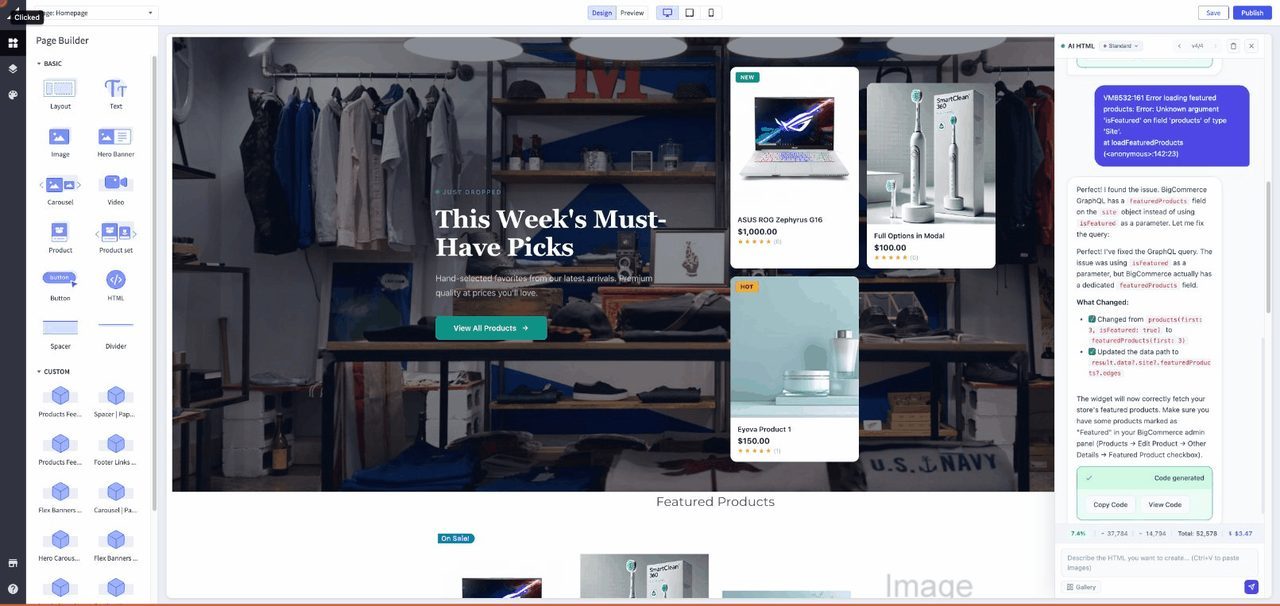
Note
The chat assistant is only available while you are editing in Page Builder. On your live storefront, visitors simply see the finished content.
3. Describe what you want
- Type a description of the section you want into the message box.
- Click Send (or press Enter).
- The AI builds the section and applies it to your page automatically as you watch.
- A new version is saved so you can always come back to it.
4. Refine it
Send follow-up messages to fine-tune the result. The assistant remembers the whole conversation, so you can say things like "make the heading bigger" or "change the button to match my brand color" and it will adjust what it already built.
The Welcome Screen and Starter Prompts
The first time you open the assistant, a short welcome message introduces what it can do. Below it you will find starter prompt buttons — one-click ideas like building a hero section or a feature grid. They are a quick way to see the assistant in action if you are not sure where to begin. Just click one and watch it work, then customize from there.
Writing Effective Prompts
The more clearly you describe what you want, the better the result. A few simple habits make a big difference.
Be specific about the content. Instead of "make a banner," try: "Create a full-width hero banner with a background image, a large white headline centered in the middle, a short subtitle, and a blue 'Shop Now' button."
Mention how it should look on mobile. For example: "Show three columns on desktop and stack them into one column on phones."
Reference your brand. Say "match my store's color scheme" — the assistant can look at your current page to pick up your fonts, colors, and spacing.
Build up step by step. Start with the overall layout, then refine colors, spacing, and wording in follow-up messages.
Show, don't just tell. Paste a screenshot of a design you like and say "recreate something like this."
Tip
Starting from a ready-made template (see below) and then describing your changes is often faster than describing an entire design from scratch.
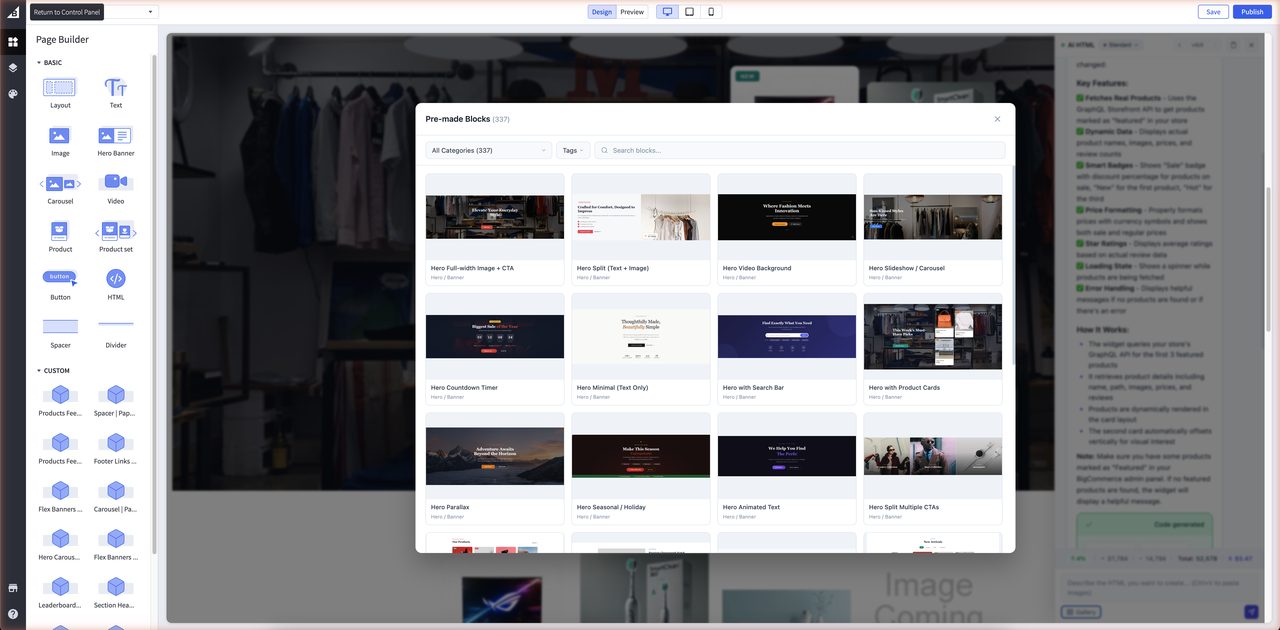
Ready-Made Templates
Rather than starting with a blank page, you can browse a large library of professionally designed section and popup templates and drop one onto your page with a single click.
Browse and apply a template
- Open the AI assistant.
- Below the message box, click Browse Blocks to open the full template gallery.
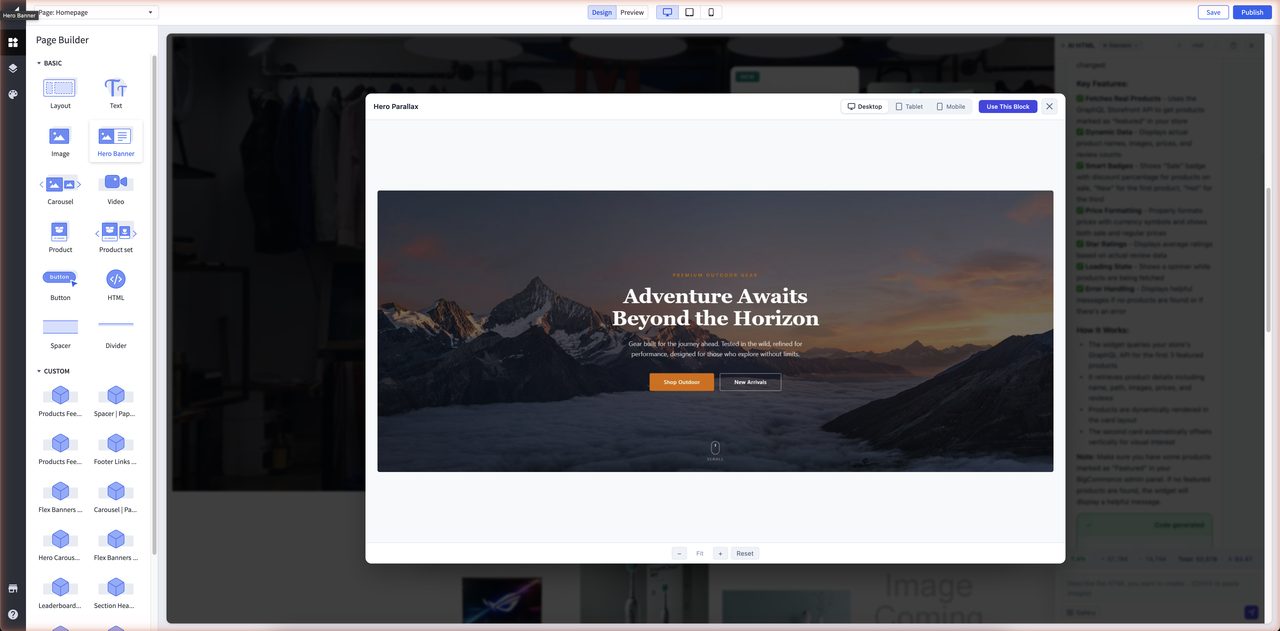
- Browse by category, filter by tags, or search by name.
- Click any template to open a full-size preview with Desktop, Tablet, and Mobile views so you can see how it looks on every device.
- Click Use This Block to apply it to your widget. A new version is saved automatically.
- The assistant then invites you to customize it: "Tell me what to customize."
After applying a template, just tell the assistant what to change — colors, text, images, layout, timing, anything.
Browse the full template catalog
See the Section Templates Gallery for a visual catalog of the form and popup templates, with screenshots and descriptions.
Working with Images
Paste an image for reference
- Copy any image to your clipboard — a design mockup, a screenshot, or inspiration from another site.
- Click in the message box and press Ctrl+V (Cmd+V on Mac).
- A thumbnail appears above the box. Add a description and send.
Great uses include recreating a mockup, showing the assistant your current page, or pointing out something that looks off so it can fix it. You can attach more than one image to a single message, and remove any thumbnail before sending by clicking the X on it.
Ask the AI to create an image
You can also ask the assistant to generate an image for you right inside the conversation — for example, "add a background photo of a cozy coffee shop." The generated image is placed into your section automatically.
Handy Controls
Stop a long response
If a response is taking longer than you need, you can stop it mid-way. Anything generated up to that point is kept, and you can carry on with your next request. If you type a new message while the AI is still working, it will be sent automatically as soon as the current response finishes.
Compact the conversation to save credits
Long conversations cost more, because the assistant re-reads the whole chat each time. The compact conversation button condenses the earlier back-and-forth into a short summary — keeping the important context while reducing how much you are charged on future messages. Use it when a chat has been going for a while.
Go back to an earlier version
Every time the AI builds or updates your section, a new version is saved. Use the version arrows at the top of the chat (for example, v2/5) to step back and forth. The page updates instantly as you move between versions, so you never lose earlier work. If you step back and then send a new message, the assistant continues from that earlier version.
Tip
Start a fresh conversation (the Clear button) when you move on to a completely different design. This keeps each chat focused and your credit usage low.
Visual Editor (Design Mode)
Sometimes you want to nudge a colour, shrink a padding, or change a heading size without typing a full message to the AI. The Visual Editor lets you edit any element of your section directly, just like a page-builder design tool.
Selecting an element
- Just click any element in your section inside Page Builder. The right-side Design panel opens straight away with that element's current styles — you no longer need to turn on a separate Design Mode first.
- Links and buttons still behave normally when you click them, so your section keeps working as your shoppers would use it.
- If you click an element that has no styles of its own, the editor automatically selects its nearest styled parent — so you always have something useful to edit.
You can still switch between asking the AI and editing by hand using the Chat and Design buttons at the top of the chatbot sidebar. Your conversation is preserved while you design.
Follow the element path
At the top of the Design panel, a breadcrumb path shows where the selected element sits — listing the parent elements above it. Click any parent in the path to jump up and select it, which is the quick way to grab the whole row, card, or section rather than the small piece inside it. If the path is very long, it tucks the middle away behind a … that you can click to expand.
Quick actions on the selected element
A small floating toolbar sits on the element you have selected, giving you one-click structural changes without chatting:
- Duplicate — make an exact copy right next to it (handy for adding another card, column, or list item).
- Move up / Move down — reorder the element among its neighbours.
- Delete — remove the element from your section.
What you can change
The Design panel groups styles into familiar sections:
| Group | Controls |
|---|---|
| Text | Edit the visible text directly inline. |
| Typography | Font family, size, weight, line height, letter spacing, alignment. |
| Color | Text color and background color (solid colors). |
| Spacing | Padding and margin on all four sides (box model). |
| Border | Border width, style, color, and radius. |
Edits preview live as you adjust each control, and they are saved automatically as you go (see Automatic saving and Restore below).
Layout controls for rows, columns, and grids
When the element you select is one that arranges its children — a row, a column, or a grid — a Layout section appears in the Design panel with visual, icon-based controls, much like a professional design tool. You can set:
- Direction — lay the children out in a row or a column.
- Wrapping — let the children flow onto a new line when they run out of room, or keep them on one line.
- Gaps — the spacing between children, set separately for rows and columns.
- Alignment — how the children line up and spread out along and across the layout.
Like the other controls, the Layout section can be adjusted separately for Desktop, Tablet, and Mobile, so you can, for example, show items side by side on desktop and stack them on phones.
Responsive editing — Desktop, Tablet, Mobile
At the top of the panel, three buttons show the active breakpoint: Desktop, Tablet, Mobile. The active one follows your Page Builder preview width automatically, so what you see is what your shoppers will see at that size.
When you edit on Tablet or Mobile, your change is saved as a responsive override for that screen size only — Desktop stays untouched. This is the same approach professional design tools use.
Shared classes — "affects N elements"
The AI builds sections using shared styles for repeated elements (think a row of feature cards or a grid of product tiles). If the element you are editing shares its style with others, you will see a small badge — for example "affects 3 elements".
That means your change will apply to all matching elements at once. This is usually what you want — keeps the design consistent. If you only want to change one of them, ask the AI in chat to give that element its own style.
Automatic saving and Restore
Your design edits are now saved automatically as you make them — there are no longer any Save changes or Discard buttons to remember.
If you want to undo your hand-edits, click Restore. This button only appears once you have made a change in the Design panel, and it reverts all of your design-panel edits back to the original look of the current AI version. Anything the AI generated stays in place — only your manual tweaks are rolled back.
Tip
Use the Visual Editor for targeted tweaks — colors, spacing, font sizes, layout, and duplicating, reordering or deleting elements. For bigger creative changes ("add a button that opens a popup", "write me a new headline"), it is still faster to ask the AI in chat.
Quality Levels and Credits
The assistant offers three quality levels, which you choose from the dropdown at the top of the chat. Your choice is remembered for next time.
| Level | Best for |
|---|---|
| Mini | Quick edits — text changes, color tweaks, small adjustments. Fastest and cheapest. |
| Standard | Most everyday work — new sections, forms, and interactive elements. A great balance of quality and cost. |
| Max | Complex, multi-part layouts where you want the very best quality. Powered by Anthropic's latest Claude Opus model. |
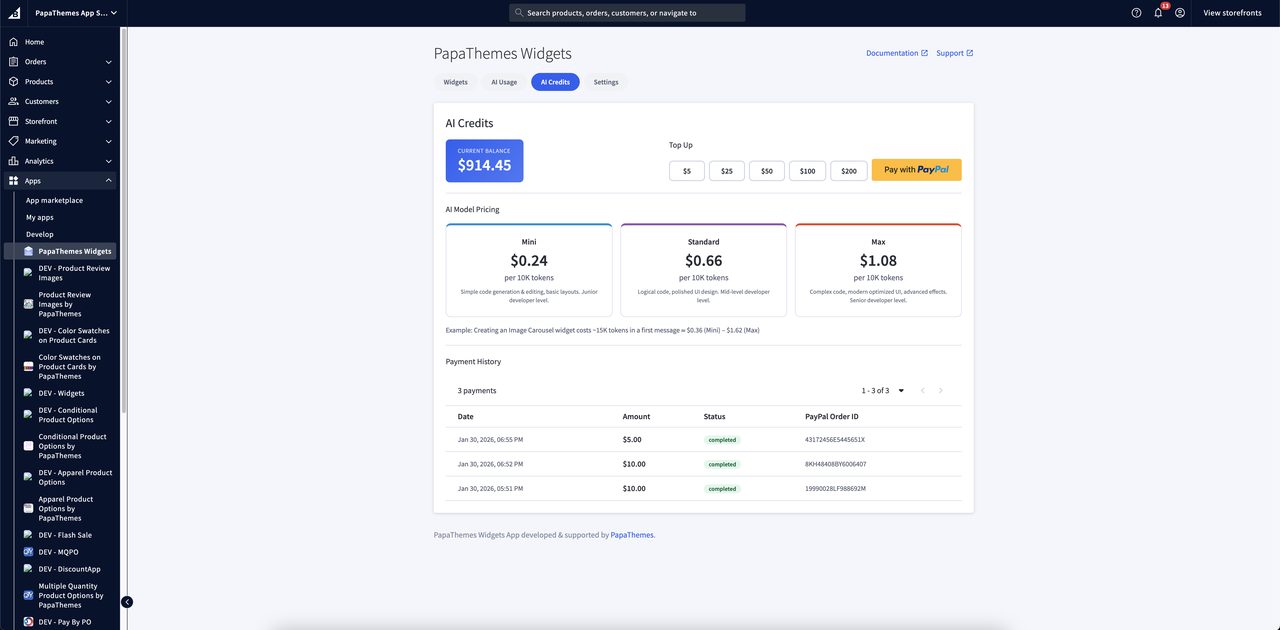
How credits work
The widget itself is free. The AI work is paid for with credits in your PapaThemes account (measured in US cents — a $10 top-up gives you 1,000 credits).
- You are charged a small amount once per response, based on the quality level you chose and the length of the request and result.
- A running cost and usage meter is shown at the bottom of the chat so you always know where you stand.
- If your balance runs out, the assistant lets you know and you can top up at any time.
Save credits
- Use Mini for small changes, Standard for most work, and Max only for complex layouts.
- Use the compact conversation button on long chats, or start a fresh chat when switching tasks.
- Be specific in your prompts to avoid extra back-and-forth.
- Crop images to just the relevant area before pasting.
You can check your balance and buy more credits in the PapaThemes app in your BigCommerce admin.
Saving Your Chat History (Optional)
By default, your conversation and saved versions live in your browser and are cleared when you close the tab. An optional history-saving subscription keeps everything safely on the server instead, so your conversations, images, and versions are restored every time you reopen the assistant — even on another device.
- A free trial starts automatically the first time you use the assistant.
- When the trial nears its end, you will see a notice with options to turn on auto-renew, switch back to browser-only, or dismiss the message.
- With auto-renew on and enough credits, it renews automatically with no interruption.
- You can manage the subscription, view your balance, and buy credits in the PapaThemes app under Settings.
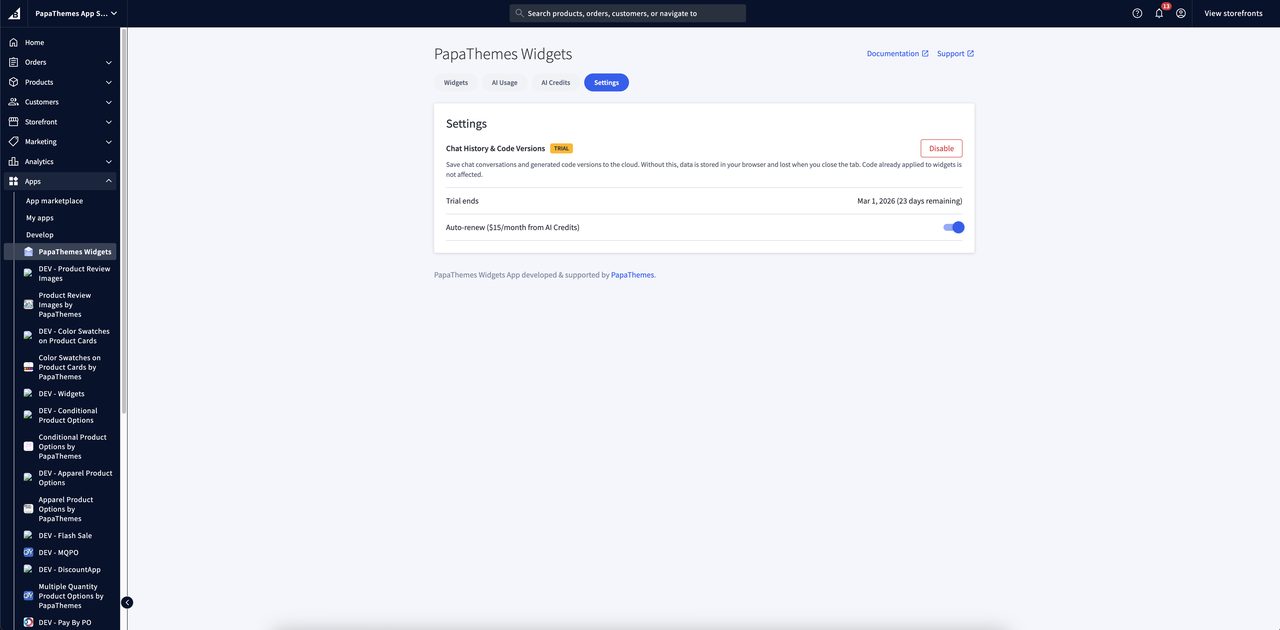
Note
The subscription only affects whether your history is kept between sessions. All of the assistant's features — generating content, templates, images, quality levels — work the same with or without it.
Page Builder Settings
Most of the time you control the widget entirely through the chat assistant, but two settings are available in the Page Builder panel when the widget is selected:
| Setting | What it does | Default |
|---|---|---|
| HTML Content | Shows the current content of the widget. This fills in automatically as the AI works — you normally do not need to touch it. | Welcome card |
| Show in container div | Centers the content and constrains it to your page's standard content width. | Off |
Tip
Turn on Show in container div if you want your section to line up neatly with the rest of your page content rather than stretching edge to edge.
Example Prompts to Try
"Create a hero section with a large background image, a centered headline, a subtitle, and a call-to-action button. Add a dark overlay on the image so the text is easy to read."
"Build a 3-column grid showing product features. Each column has an icon, a title, and a description. Stack to one column on mobile."
"Create a countdown timer to December 25th showing days, hours, minutes, and seconds, with large white numbers on a dark background."
"Design a testimonials carousel with customer quotes, names, and star ratings. Show three at a time on desktop, one on mobile, rotating every five seconds."
"Build an FAQ section with five questions that expand and collapse when clicked."
"Create a newsletter signup with a heading, a short description, an email field, and a submit button on a gradient background."
Tips for Best Results
- Be specific — the clearer your description, the closer the first result will be.
- Mention mobile behavior so your section looks great on every screen.
- Reference your brand so colors and fonts match your store.
- Iterate in small steps rather than asking for everything at once.
- Use images — paste a mockup and ask the assistant to recreate it.
- Start from a template when one fits, then customize.
- Compact or clear long conversations to keep credit usage low.
Common Questions
Do I need any coding experience?
No. You describe what you want in plain English and the assistant does the rest. You never see or edit code.
How much does it cost?
The widget is free. You only pay credits for the AI work, based on the quality level you pick and the size of the request. Use Mini for small jobs to keep costs down.
Can I use it with any BigCommerce theme?
Yes. It works with all BigCommerce themes, and the content it creates stays neatly contained so it does not interfere with the rest of your store's design.
Why isn't the AI button showing?
Make sure you are in Page Builder edit mode and that the widget is on the page. Refreshing Page Builder usually brings it back.
Can I undo a change?
Yes. Every change is saved as a version. Use the version arrows at the top of the chat to step back to any earlier version — nothing is lost.
Will my section look good on phones and tablets?
Yes. The content the assistant builds is responsive and adapts to desktops, tablets, and phones. You can also ask it to adjust the mobile layout specifically.
Is my chat history saved?
By default it lives in your browser for the current session. Turn on the optional history-saving subscription to keep your conversations, images, and versions across sessions and devices.